Curved origami and tangent developables
Summary:
I made a lot of things out of paper over the trimester. I describe some of the mathematics of developable surfaces, which are the surfaces you can make from paper. Along the way, I describe how to make many cool shapes.
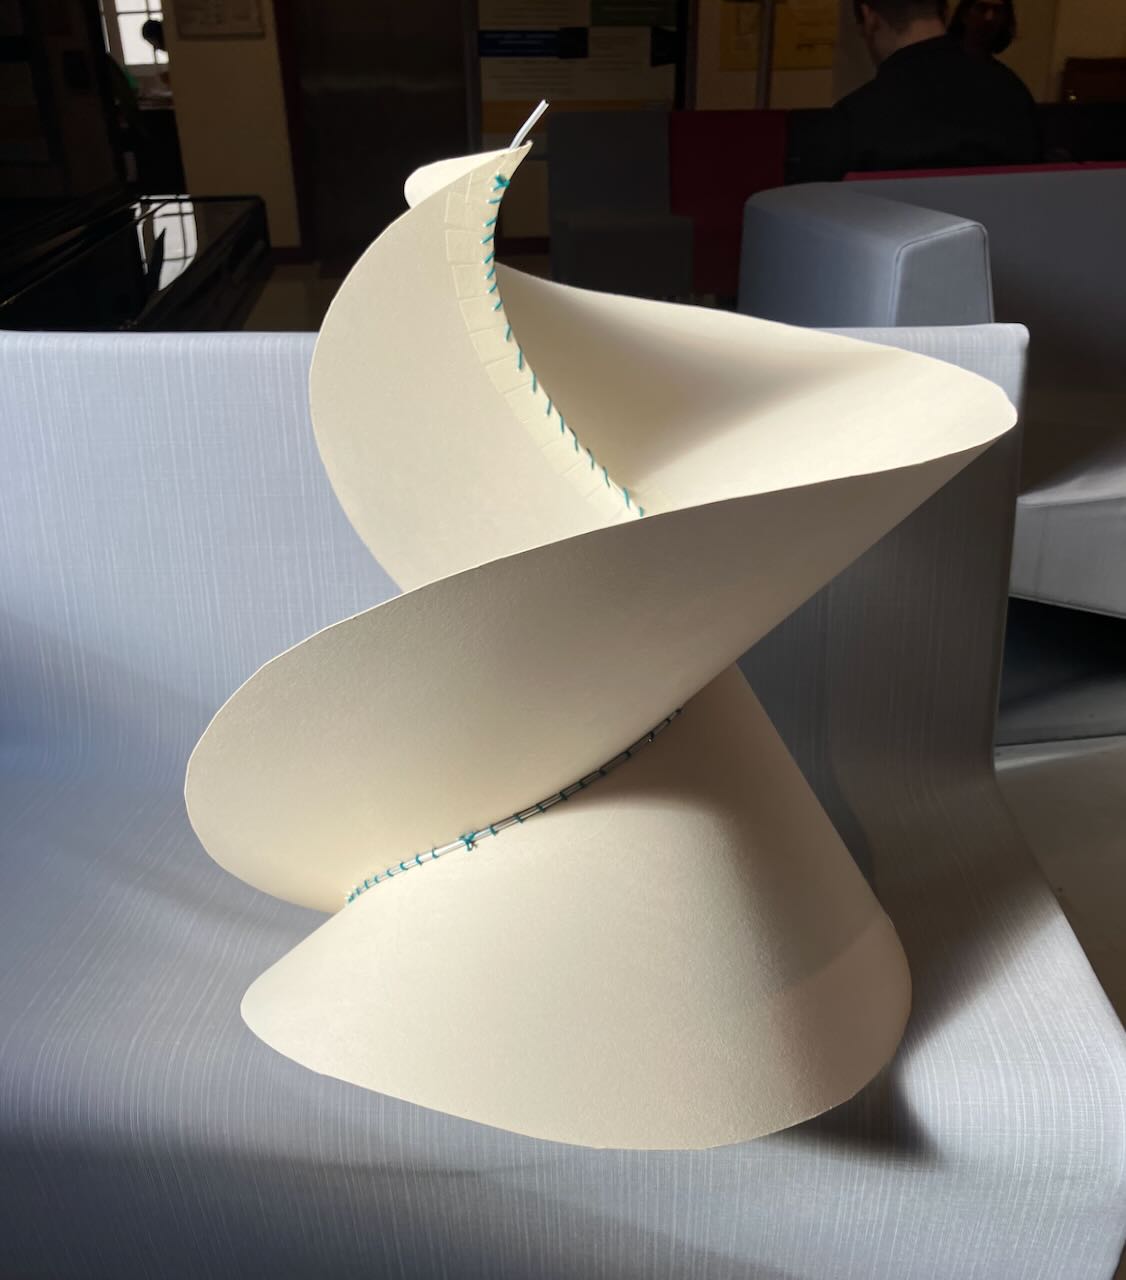
Table of contents:
- Developable surfaces
- Tangent Developables
Developable surfaces
A piece of paper is a surprisingly rigid. Though paper may bend as much as it likes, it cannot stretch. The fibers can’t slide past one another. The material properties of paper ensure that it conforms to a a surface in $\RR^3$ where the lengths and angles along the surface are the same as those on the flat plane. In the language of differential geometry, the surface of a bent sheet of paper is isometric to the flat plane. A sphere has a different metric then the plane, its curvature distorting lengths and angles, so it cannot be formed from paper without stretching or folding.
Despite these metric restrictions, paper can fold into some beautifully curvy shapes. Which shapes is paper allowed to make?
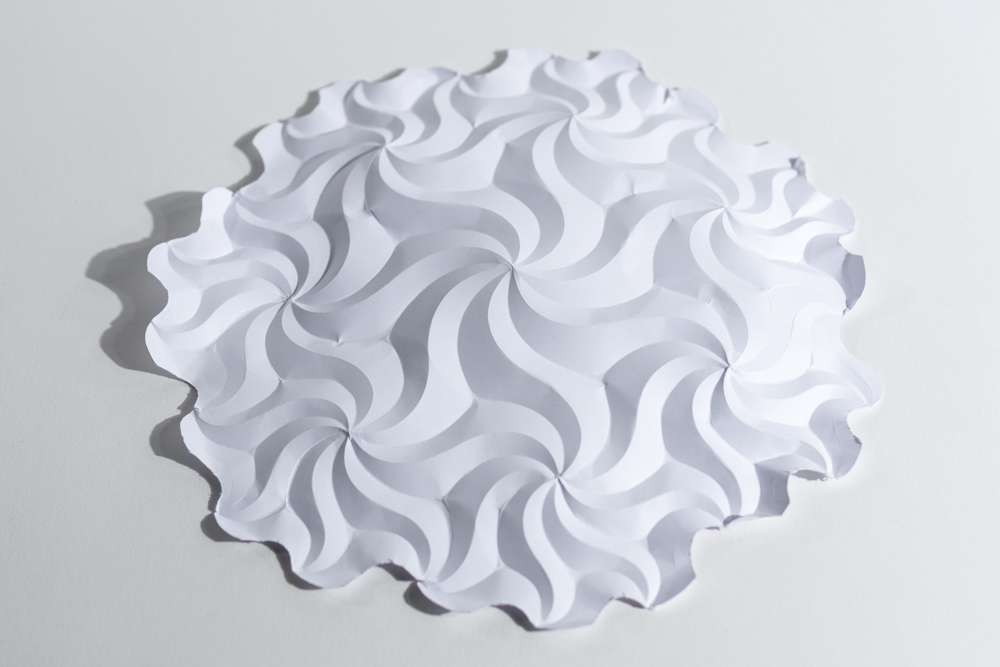
A curved crease hyperbolic origami tessellation
With Mrinal Dhume (Picture credit Edmund Harris). See here for details
The answer comes from curvature. Through a point on our surface, we can look at cross sections of the surface through a plane orthogonal through the surface. Find the plane which achieves the maximum and minimum of the curvature of the cross sections. The values of these two curvatures are the “principle curvatures” at that point. The Gaussian curvature at a point is defined as the product of the principle curvatures. For example, when the surface is a flat plane, all principle curvatures are zero and the gaussian curvature is zero. For a cylinder, the direction of maximal curvature is a circular section of the cylinder, which has positive curvature. The direction of minimal curvature is a line parallel to the axis of the cylinder, which has zero curvature. The product of these is zero, so a cylinder has zero gaussian curvature at every point.
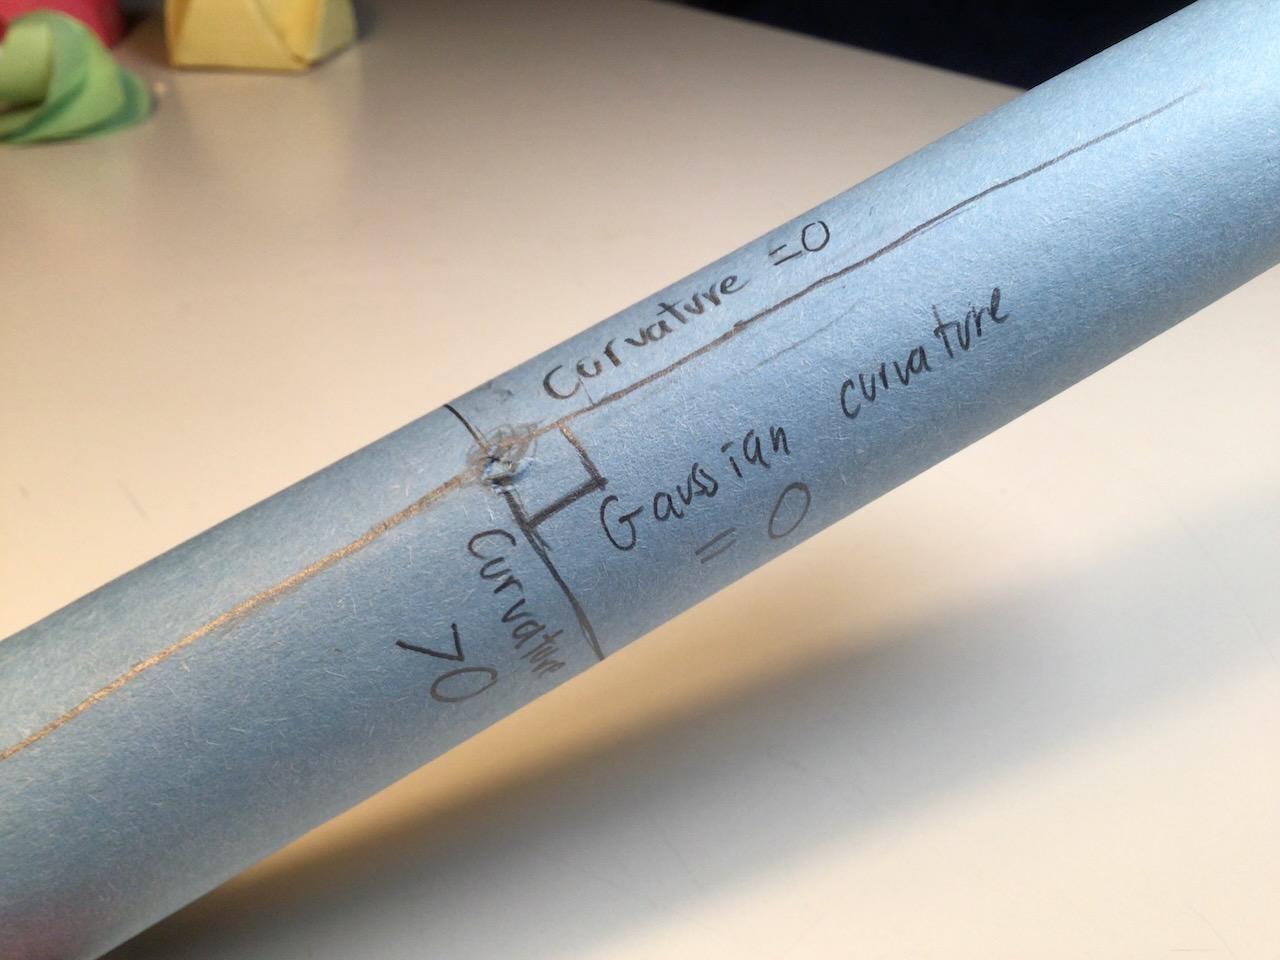
The gaussian curvature of a cylinder is zero
We see that a cylinder rolled out of paper has gaussian curvature zero. In fact, any surface made with paper has gaussian curvature zero, and any surface with gaussian curvature zero can be assembled from paper. This is the content of Gauss’s Theorem Egregium (the wonderful theorem). Mathematically, two surfaces are isometric if and only if their gaussian curvatures are the same. This is striking, because the particular values of the principle curvatures can differ between two isometric surfaces, but their product is constant. (Compare the cylinder to the plane.)
You’ve applied the theorem Egregium if you’ve ever eaten a particularly floppy new york slice pizza. To stop the pizza from dropping, you fold the pizza in half, setting one of the principle curvatures to be nonzero. A Pizza is intrensically flat, so it must have gaussian curvature zero. This forces the other principle curvature to be zero. Therefore, the line along the base of your fold must be straight, stopping the pizza from drooping.
Surfaces with gaussian curvature zero are called Developable surfaces. I imagine this is because they can be “developed”, rolled out of flat sheets. This is a very efficient way to manufacture three dimensional curved objects. I’d like to tell you about this sculpture showing an interesting developable surface. It’s about three feet across, quite sturdy, and quick to make.
A developable surface
To build up to this, let’s start by analyzing a developable surface thats easier to fold.
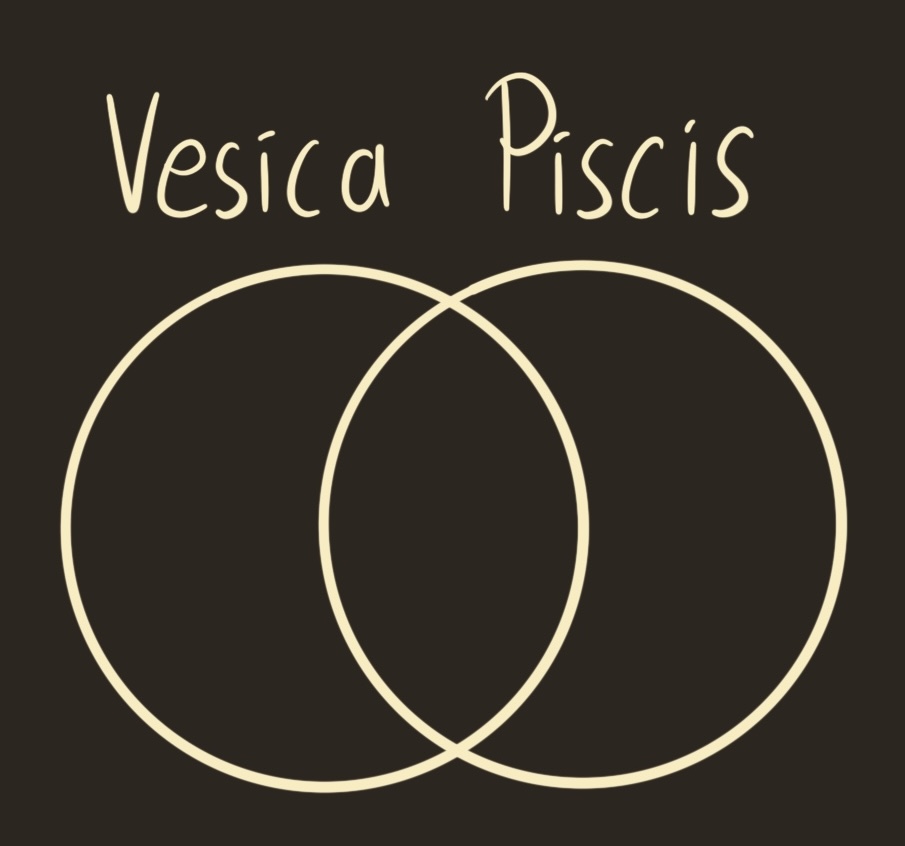
The Vesica Piscis
The Vesica Piscis is a shaped formed from two circles of equal radius, each passing through the other’s center. It is the second shape you make in sacred geometry (Or, as I prefer, cursed geometry), and it makes a beautiful origami. I learned about this model from the bridges paper, Folding the Vesica Piscis by Klara Mundilova and Tony Wills
Folding a Vesica Piscis
The left side is a folding pattern, which folds into the right side.
Make it yourself
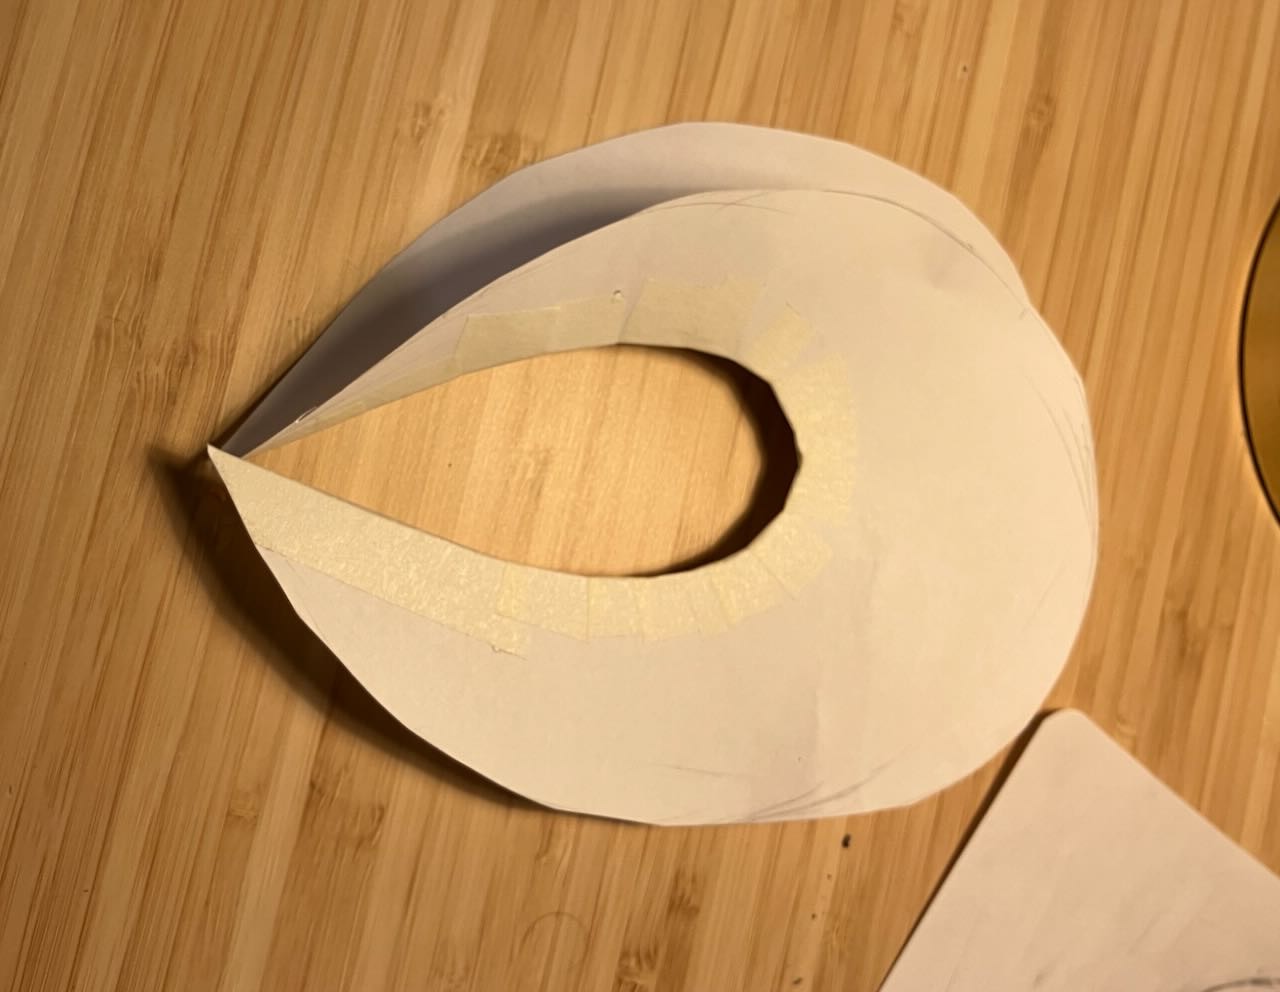
- Make the fold pattern. You can either use a compass, or print the template. I recommend using cardstock.
- Cut out the lines on the exterior of the Vesica. You should get this shape (ignore the marked lines)
- Score the inner circular arcs. It’s easiest to go over the arcs with a ball-point pen and a heavy hand.
- fold both circular arcs, each as mountain folds. This is the result:
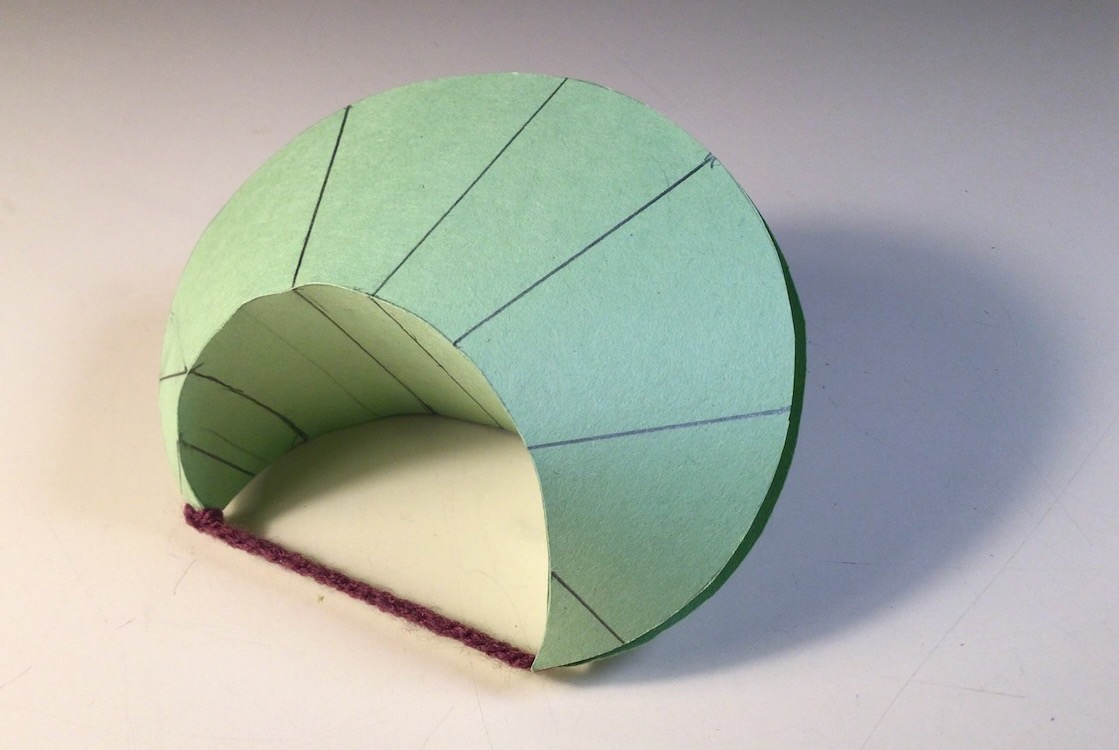
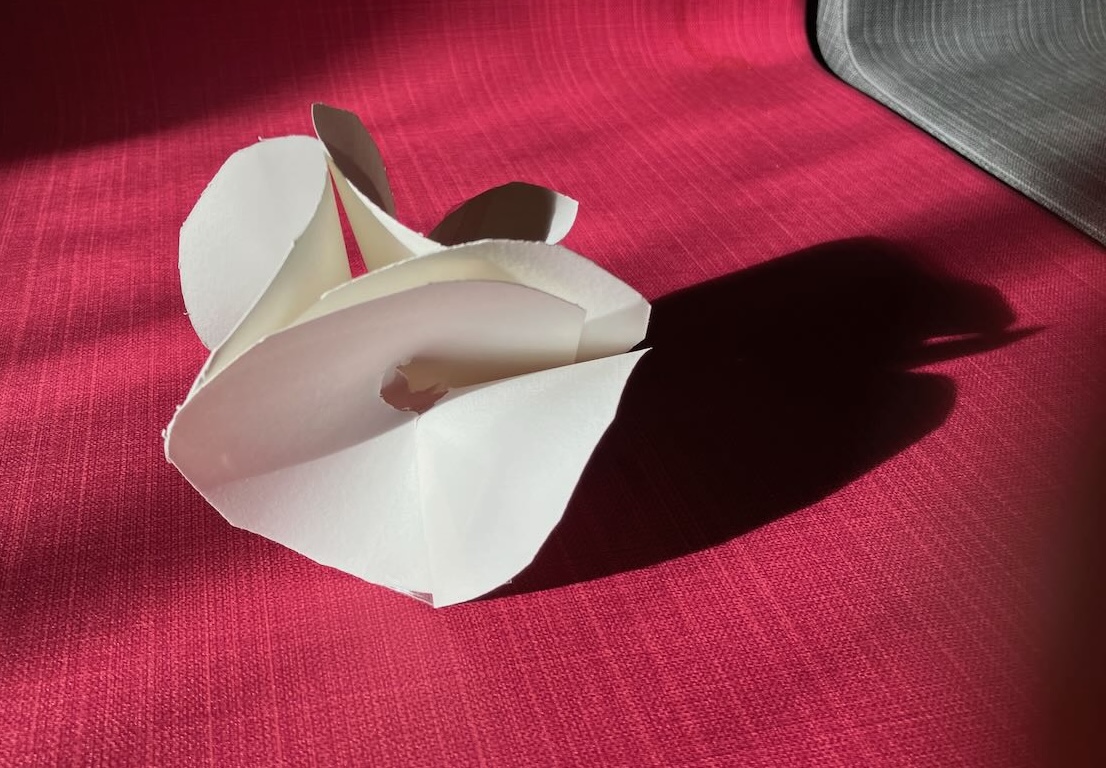
The folded Vesica Pisces is made from three developable patches, connected along the folds of the origami. Try moving the two “horns” close or far, and see how the Vesica actuates.
Classifying developable surfaces
Every non-creased point of a curved origami model must have gaussian curvature zero. In particular, there is some direction through a point with curvature zero, the “principle direction”. Moving along these directions defines a curve on the curved origami model. It turns out, this is a line in three dimensional space. These are called “lines of ruling”, because you can lie a ruler along the surface (see figure below). Any developable surface is swept out by these lines of ruling, so is a “ruled surface”
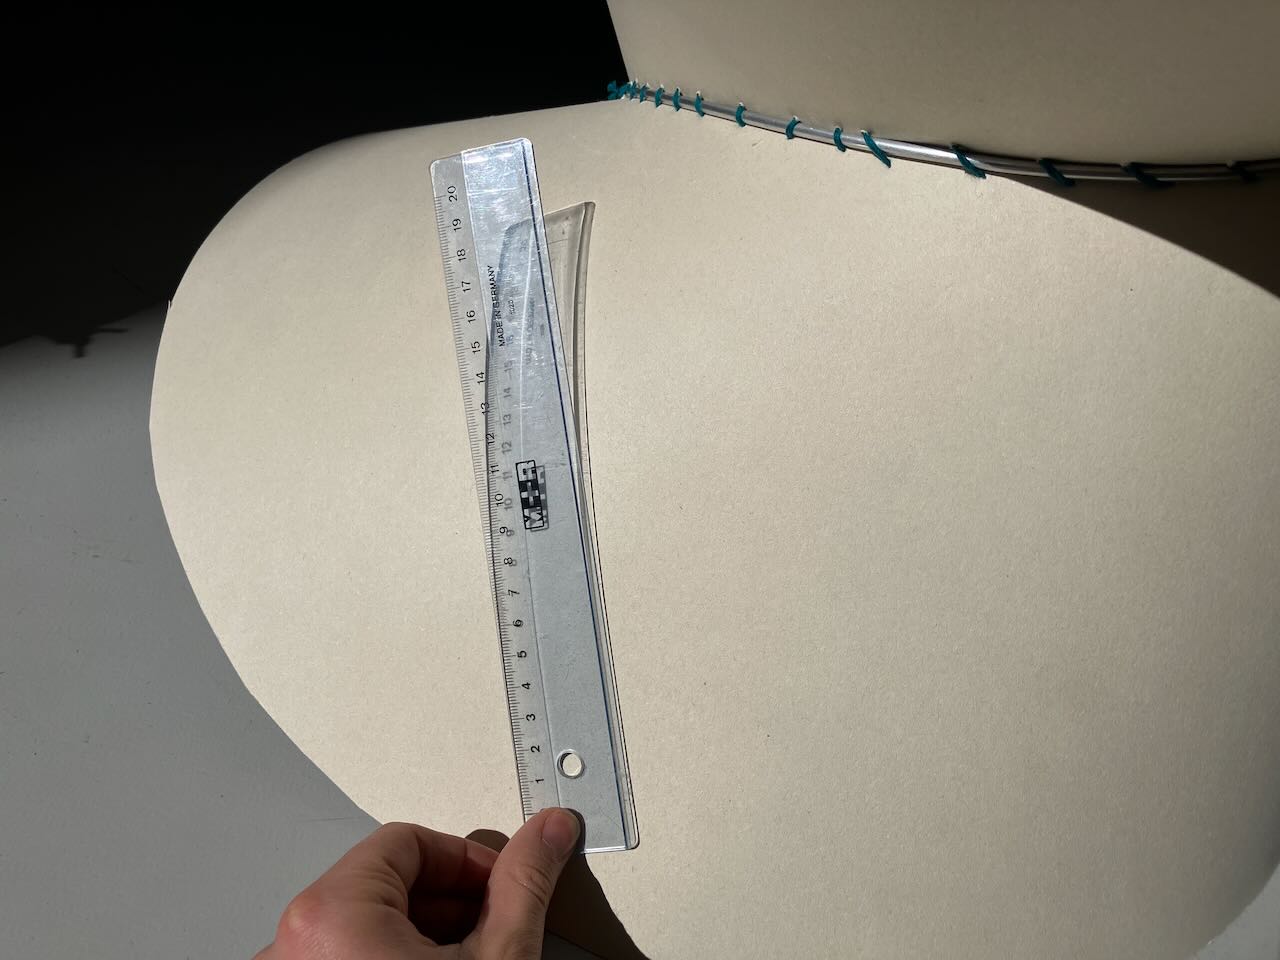
Developable surfaces are ruled
Left: a ruler following a line of ruling of a developable surface. The ruler lies everywhere on the surface.
Right: the ruler does not follow a line of ruling, and does not lie along the surface.
There are 3 types of developable surfaces, classified by their lines of ruling. A curved origami model consists of patches taken from one of these three models.
- Cylinder: All lines of ruling are parallel.
- Cone: All lines of ruling, extended into space, meet at a point.
- Tangent devlopable: All lines of ruling are tangent to a curve in three dimensional space.
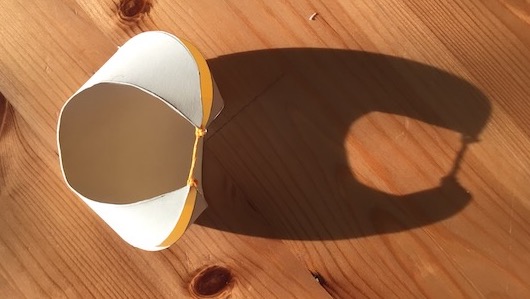
Let’s classify the pieces of the Vesica Piscis into these three parts. First, we need to figure out the lines of ruling. My favorite trick is to follow shadows. Illuminate the curved origami with parallel light rays, for example from direct sunlight. The parts of the surface pointing towards the light are illuminated, and those pointing away are in shadow. So, the line between light and shadow occurs where the surface has normal pointing orthogonal to the light. Along a line of ruling, the normal vectors are constant. Therefore, the line between light and shadow will lie exactly along a line of ruling. (Note: This does not apply to cast shadows.)
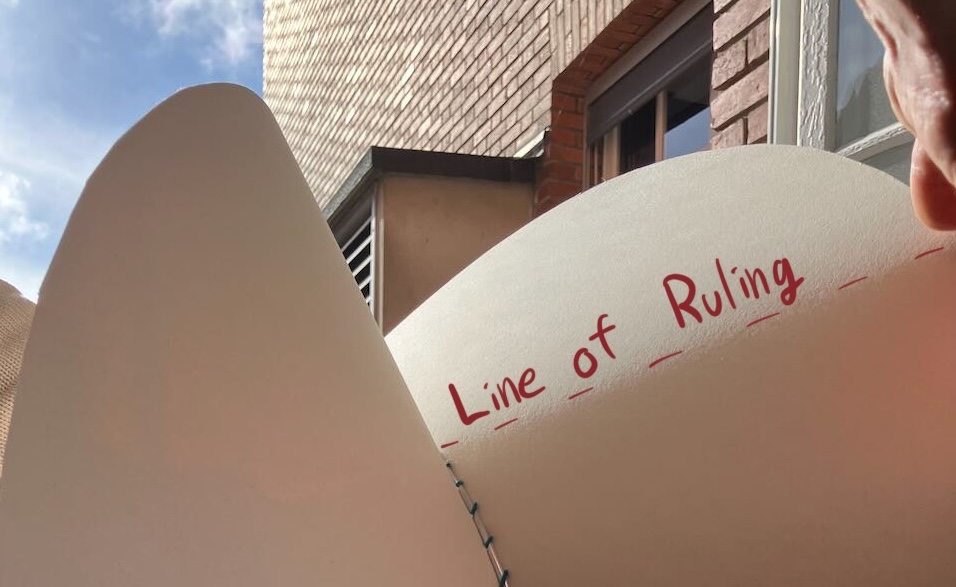
A shadow on a developable surface shows the line of ruling.
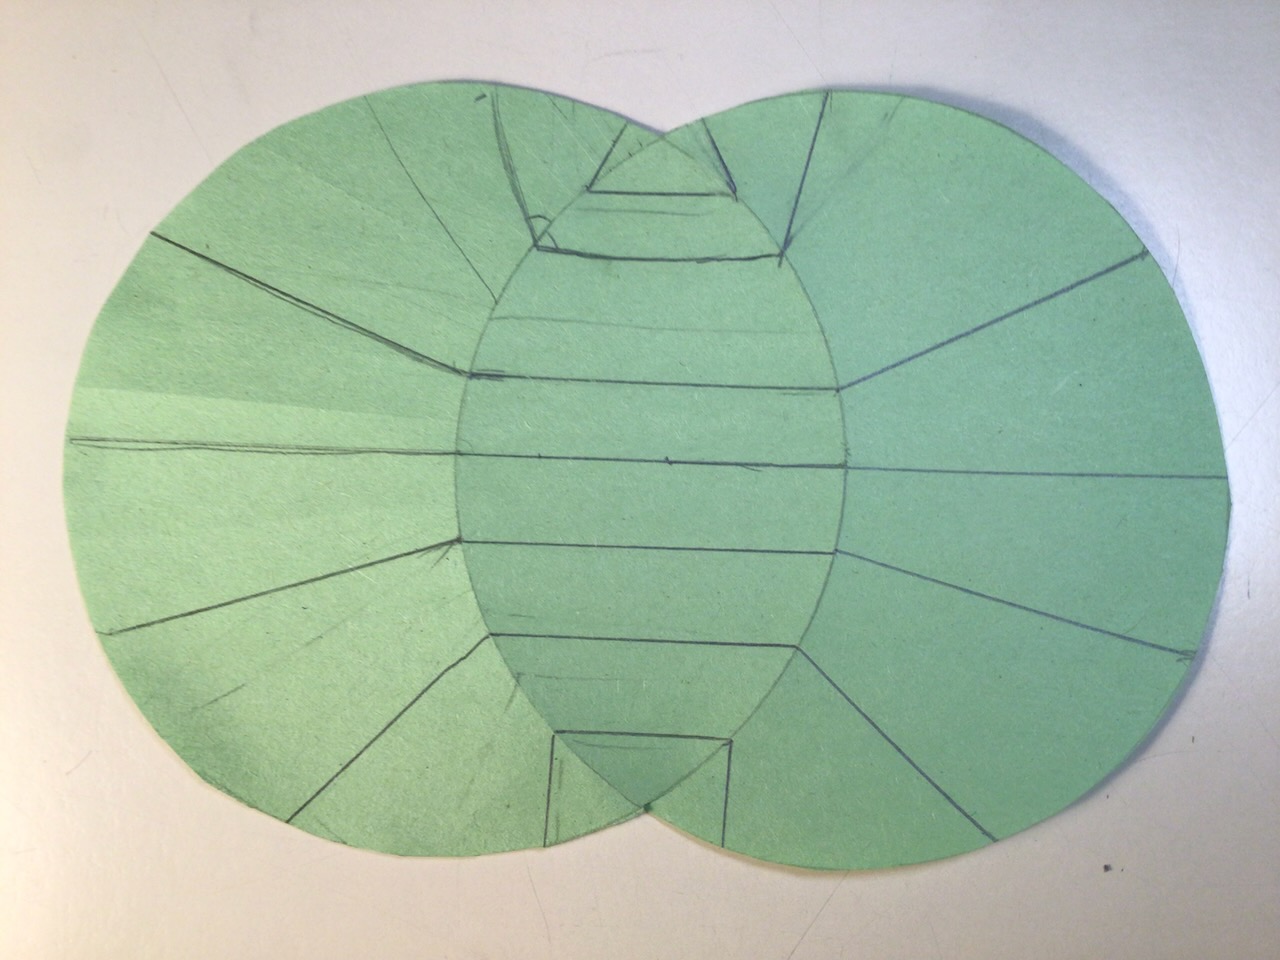
Here’s are the lines of ruling on the Vesica pisces, folded and laying flat. Instead of measuring all the lines of ruling, I used the analytic solution from Folding the Vesica Piscis. They are simple to describe in the flattened version (right picture below). On the intersection of the two circles, the lines of ruling are horizontal. Everywhere else, the lines of ruling are radial from the center of the Vesica Piscis.
Lines of ruling on folded Vesica Piscis
On the left, a folded Vesica Piscis with its lines of ruling. On the right, an unfolded Vesica Piscis with the same lines of ruling unfolded.
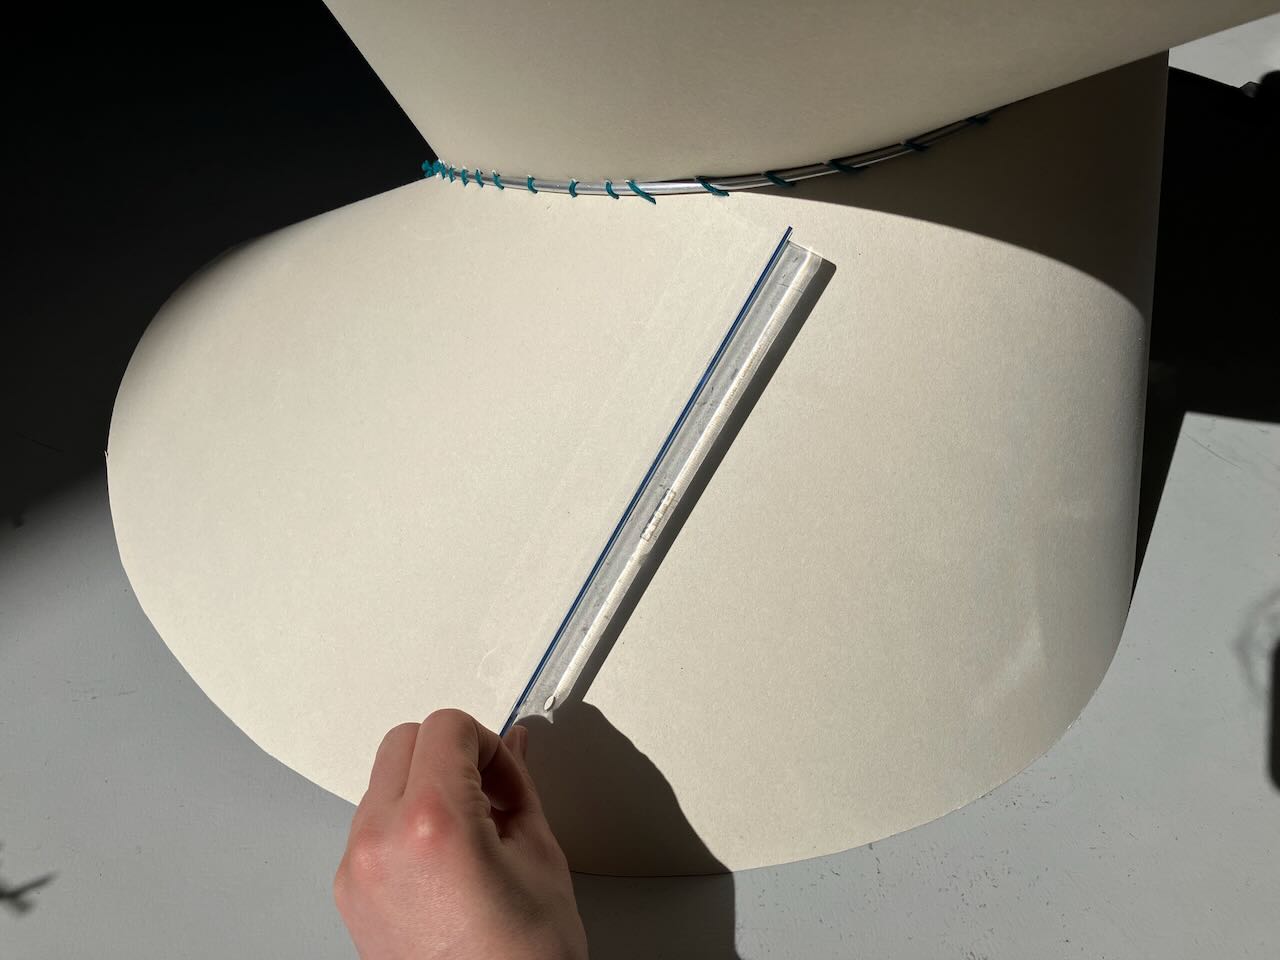
To visualize the lines of ruling, we can tape physical sticks to the origami model along the lines of ruling. Here, I unfolded the Vesica Piscis, and extended the ruling lines from the outside circle to their common meeting point at the center. When folded, the ruling lines extend past the bounds of the curved origami. The lines of ruling for each half of the Vesica Piscis meet at a point in spice. This shows that the top and bottom of the folded vesica piscis are pieces of cones.
Extending lines of ruling
Left: the folded vesica pisces, with lines of ruling extended. The lines of ruling meet at points, meaning the surface is a portion of a cone. Right: An unfolded Vesica Pisces, with extended lines of ruling all meeting in the center.
In contrast, the lines of ruling in the overlapping portion of the Vesica Piscis are all parralel, forming a Cylinder. Note that the base of the cylinder is not a circle. The Vesica piscis shows two of the three types of developable surfaces. The missing type, tangent developables, are the weirdest.
Cones
Cones can already be quite interesting developable surfaces. You can stack one inside another to form an Appolonian circle packing on a sphere:
Appolonian circle packing out of cones. Every cone shares a tip.
You can stack them one on top of eachother to build a pseudosphere
Pseodosphere made out of cones. For instructions and more info, see pseudopseudosphere
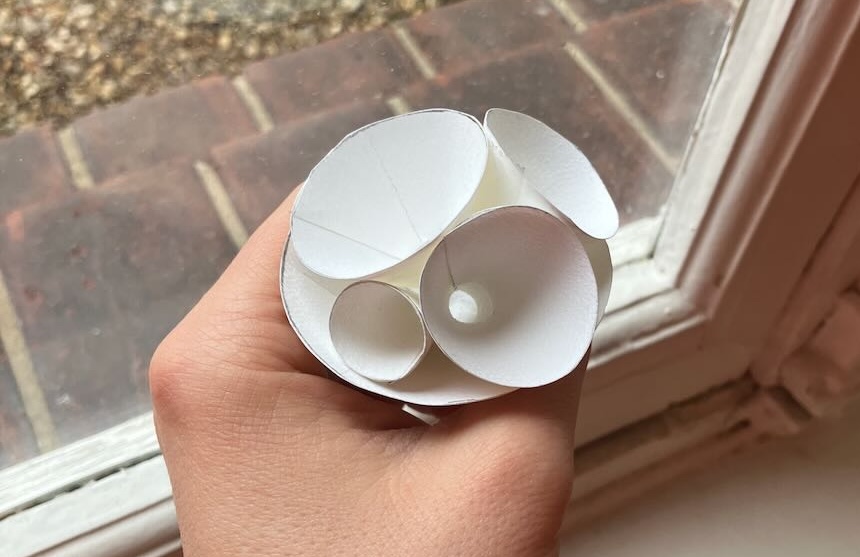
By our definition, cones don’t need a circular base. This opens up a whole universe of new cones. Here’s an activity I learned from Chaim Goodman-Strauss. you can make a cone with cone aangle greater than $2 \pi$. Take four circles, and cut slits from the outside to the center in each. Then, tape them up in a spiral. Finally, try to connect the beginning and the end, any way you can. If you manage to, you will have a cone of cone angle $8\pi$, and a unique and lovely object.
Cone with cone angle $8\pi$
The geometry enforces that the boundary of the cone will lie on a sphere. This makes great Christmas ornaments! Here’s a version I made with two different cones. The outer cone is made from 4 annuli, so the resulting shape has spherical outer and inner boundary. The inner cone then lives inside the void left from the outer cone. Here it is:
2 cones with cone angle $8\pi$, inside a bauble.
Tangent developable
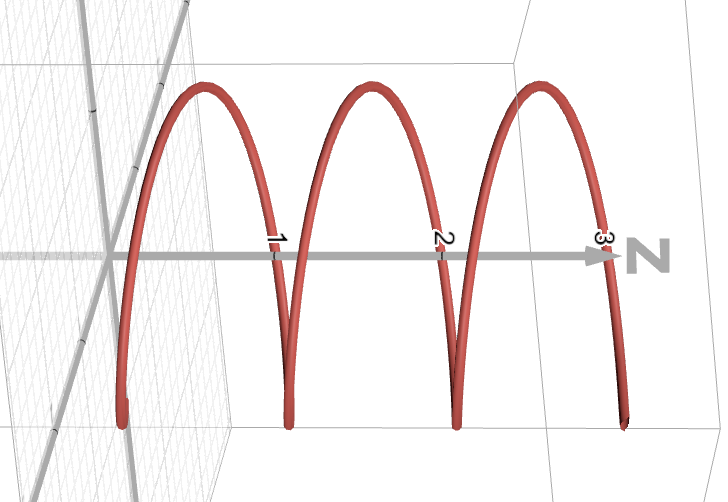
The tangent developable of a curve looks like some sort of helix spiraling around that curve.
A tangent developable
Starting with a spiral cut from paper and pulling tight twists the paper into a helix shape. This is a tangent developable of the central curve. Here is the Template
I’ve been searching for a curved crease origami piece showing off tangent developable. For a long time, my best bet was above. This is rather contrived, forcing the rulings by scoring or precreasing the paper. The paper itself should force the lines of ruling…
Tangent developable of the helix
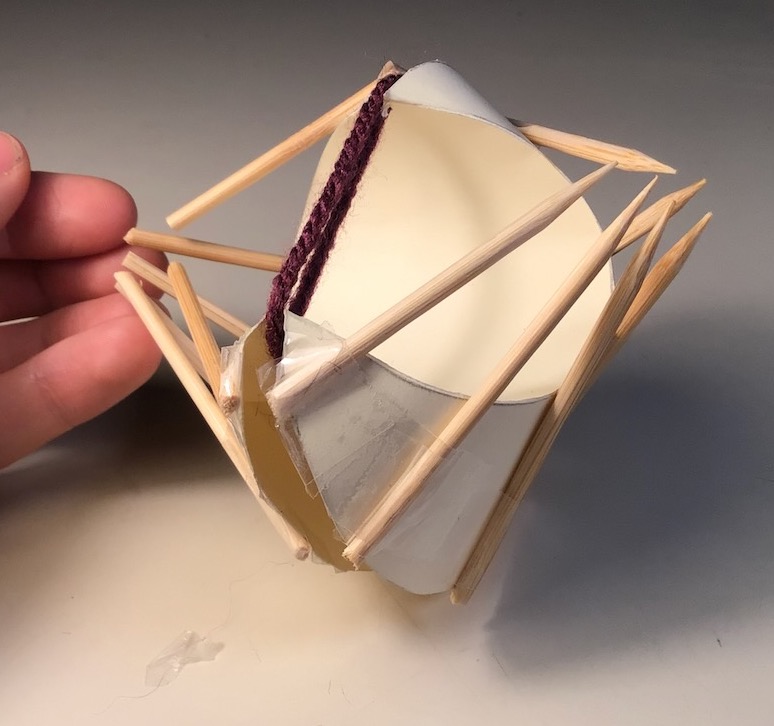
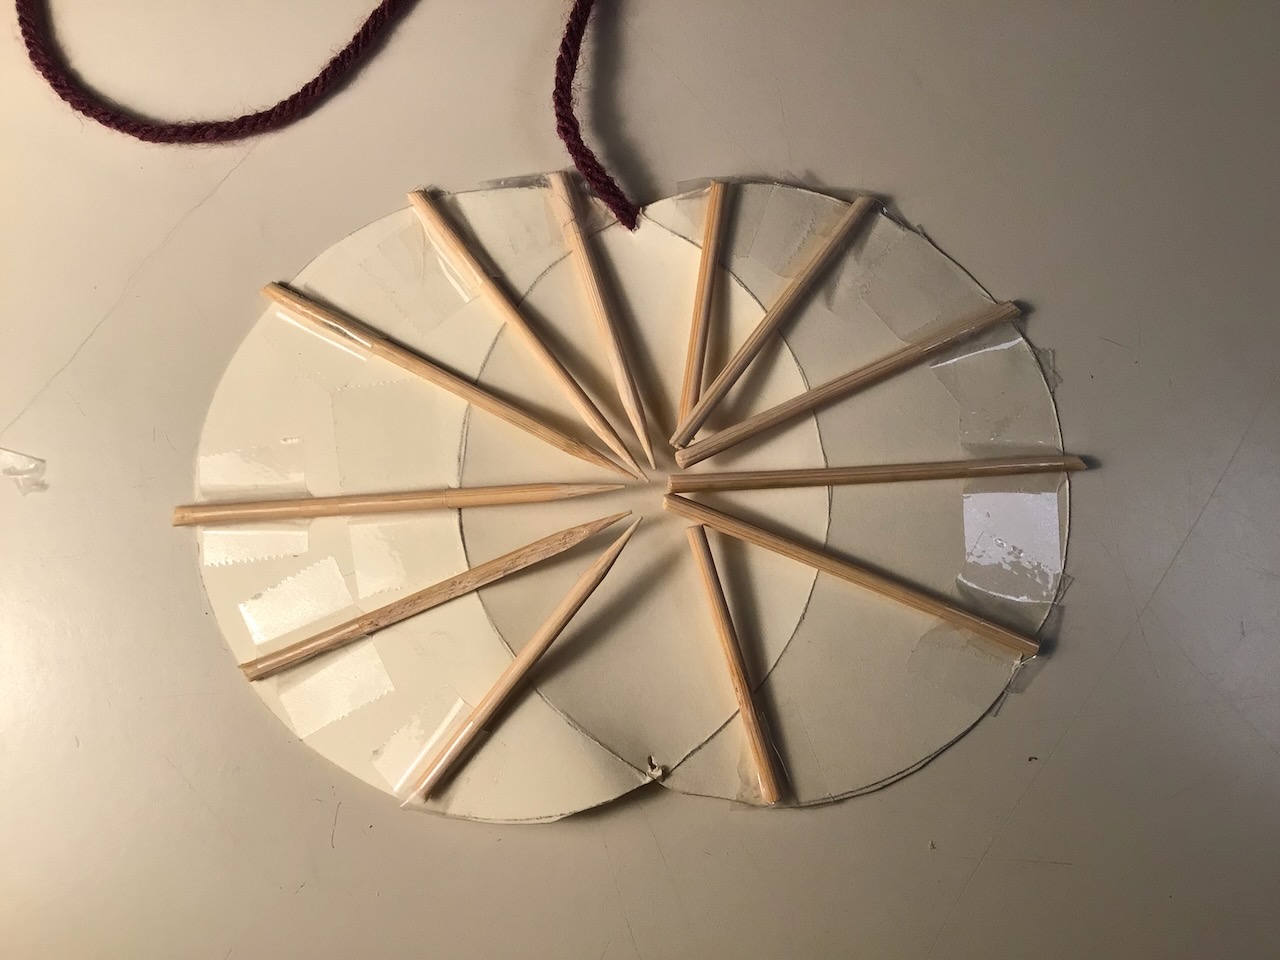
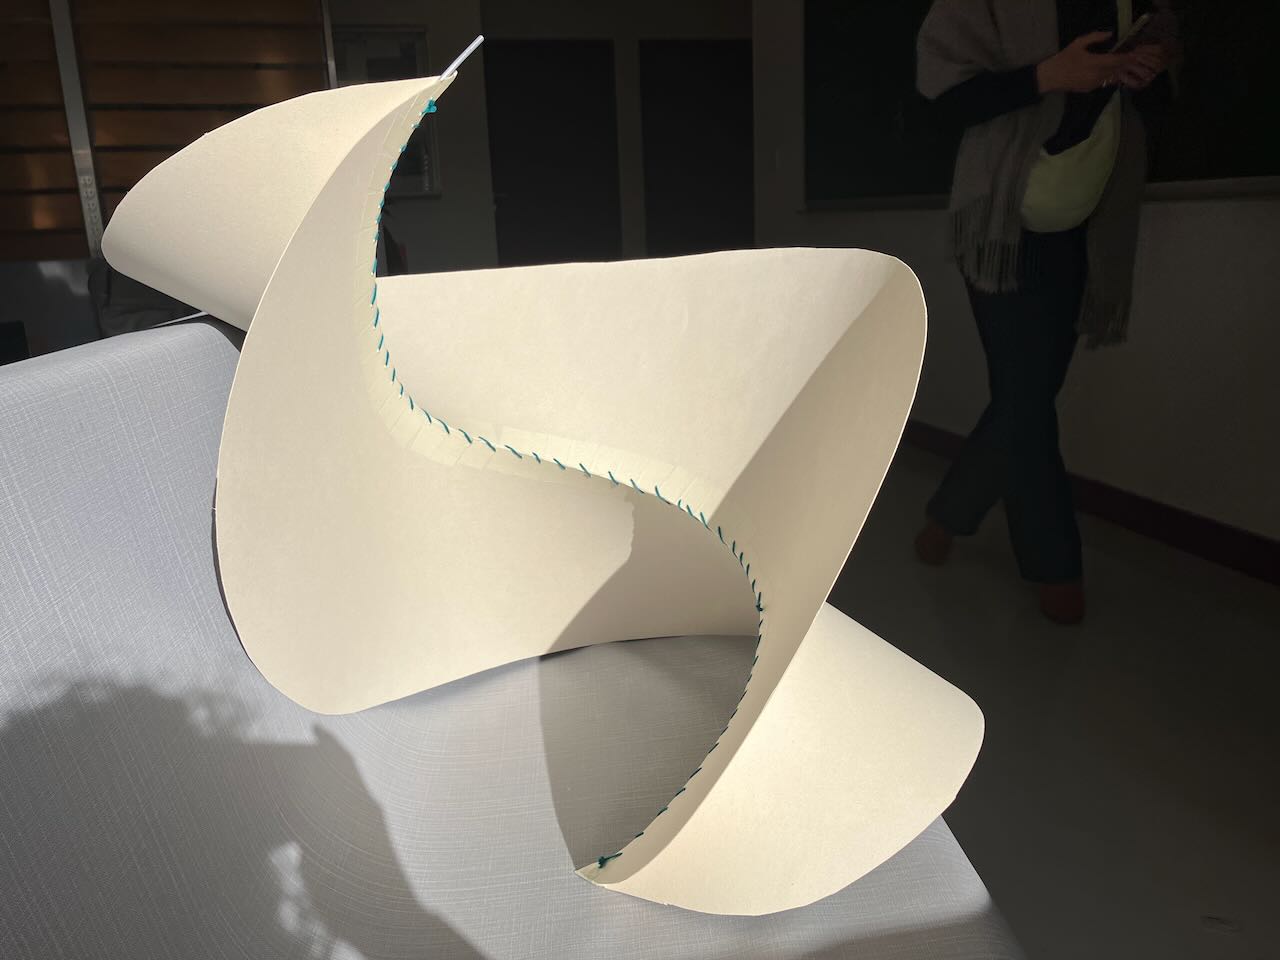
At the IHP semester in math illustration, Chaim Goodman-Strauss showed me a way to make the tangent developable of a helix. Start by cutting two copies of an annulus out of paper, and cut a slit in both. Tape the inside circles of each annulus together (Picture 1 below). Then, pass a coffee stirrer through the hole and tape it tangent to the inside curve, along the inside and the outside (picture 2 below). Repeat with many such coffee sticks, evenly spaced around the annulus. Make sure that you leave the two ends of the slit separate from one another.

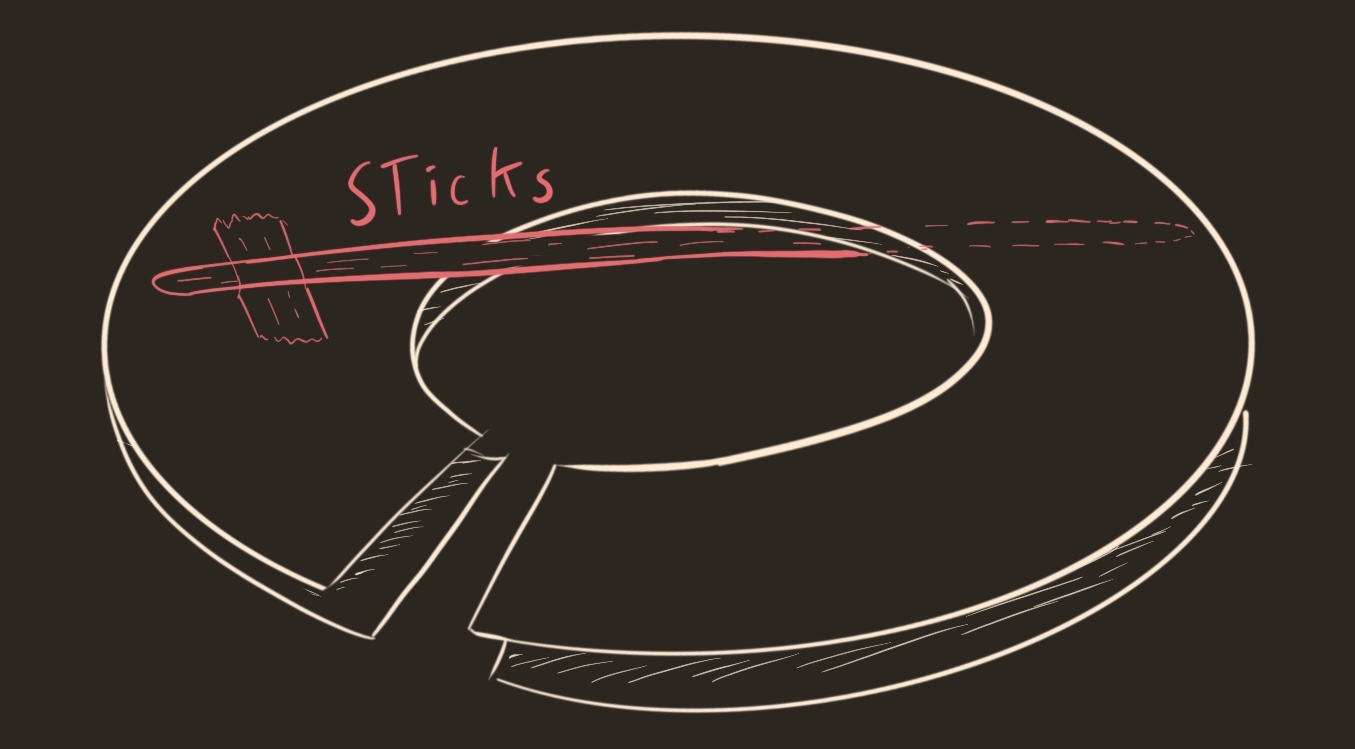
Instructions for making a helix tangent developable.
After attaching all your sticks, you end up with this device:
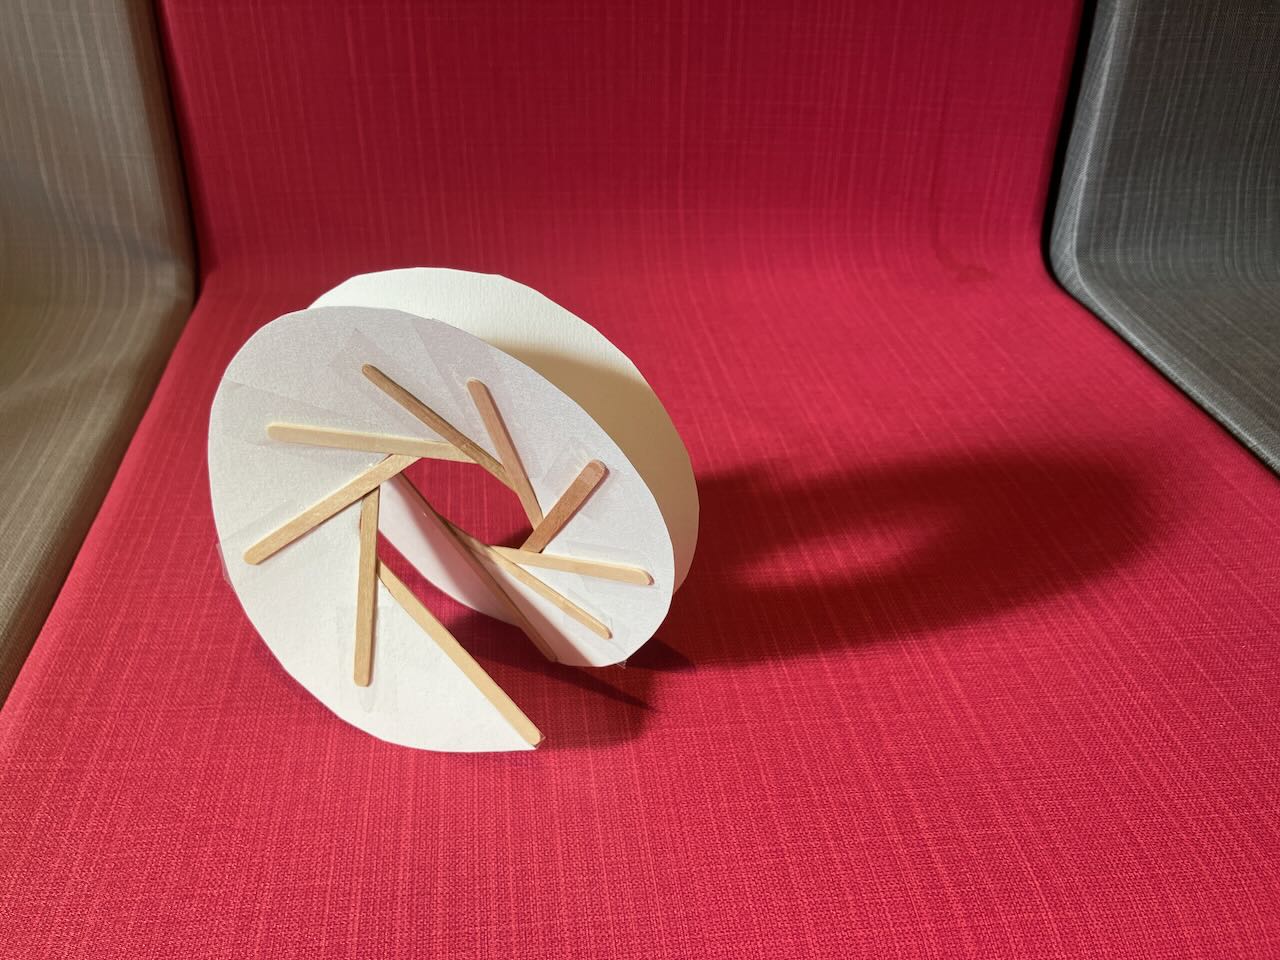
A tangent developable of a helix
The coffee stirrers force the lines of curvature to be tangent to the inside curve. No matter what, the surface is a tangent developable for the inside curve. But, the inside curve isn’t fixed, and the helix can be stretched out and contracted. It’s a fun toy. Here’s a couple of the above helix, chained together into a longer helix:
A family of tangent developable, from the same sheet of paper
The cubic discriminant locus
I spent much of my semester in the shape mines, sitting on the floor of the common area making things out of paper. This is the best place in the institute to spy on people. I overheard Pierre Arnoux, Stepan Paul, and Adrien Abgrall trying to visualize the discriminant locus in the space of cubic equations. We associate a monic cubic $x^3 + a x^2 + bx + c$ to a point $(a,b,c)\in \RR^3$. The discriminant locus is the set of cubics with a double real root, which traces out a surface in $\RR^3$. Here’s some facts about the discriminant locus:
- The discriminant locus certainly contains the cubics with a triple real root. These take the form $(x+t)^3 = x^3 + 3 t x^2 + 3 t^2 x + t^3$. The cubics with triple root trace out the twisted cubic curve $\gamma(t) = (3t,3 t^2,t^3)$.
- If a polynomial has double root at $t$, then it belongs to a family $(x+t)^2 (x+t+a) = (x+t)^3 + a (x+2t + t^2)$. In the space of coefficients, such a polynomial lies on the line passing through $\gamma(t)$ with slope $(1,2t,t^2)$. This slope is exactly $\gamma’(t)/3$, so the polynomial lies on the tangent line to $\gamma$ at $t$.
All together, the space of cubics with double real roots is the union of all tangent lines to the twisted cubic $\gamma$. The discriminant locus is a tangent developable! Therefore, it has gaussian curvature zero.
This gives the opportunity for folding the discriminant locus out of paper. Their scheme was very similar to Chaim’s helicoid. Start with two sheets of paper, with a curve cut out of both, and tape the sides together. Then, after bending the curve into the shape of the twisted cubic in $\RR^3$, the paper would form the tangent developable. One sheet forms the forward tangents, and the other the backward tangents. You need to do math to compute the curve in $\RR^2$ that develops into the twisted cubic in $\RR^3$.
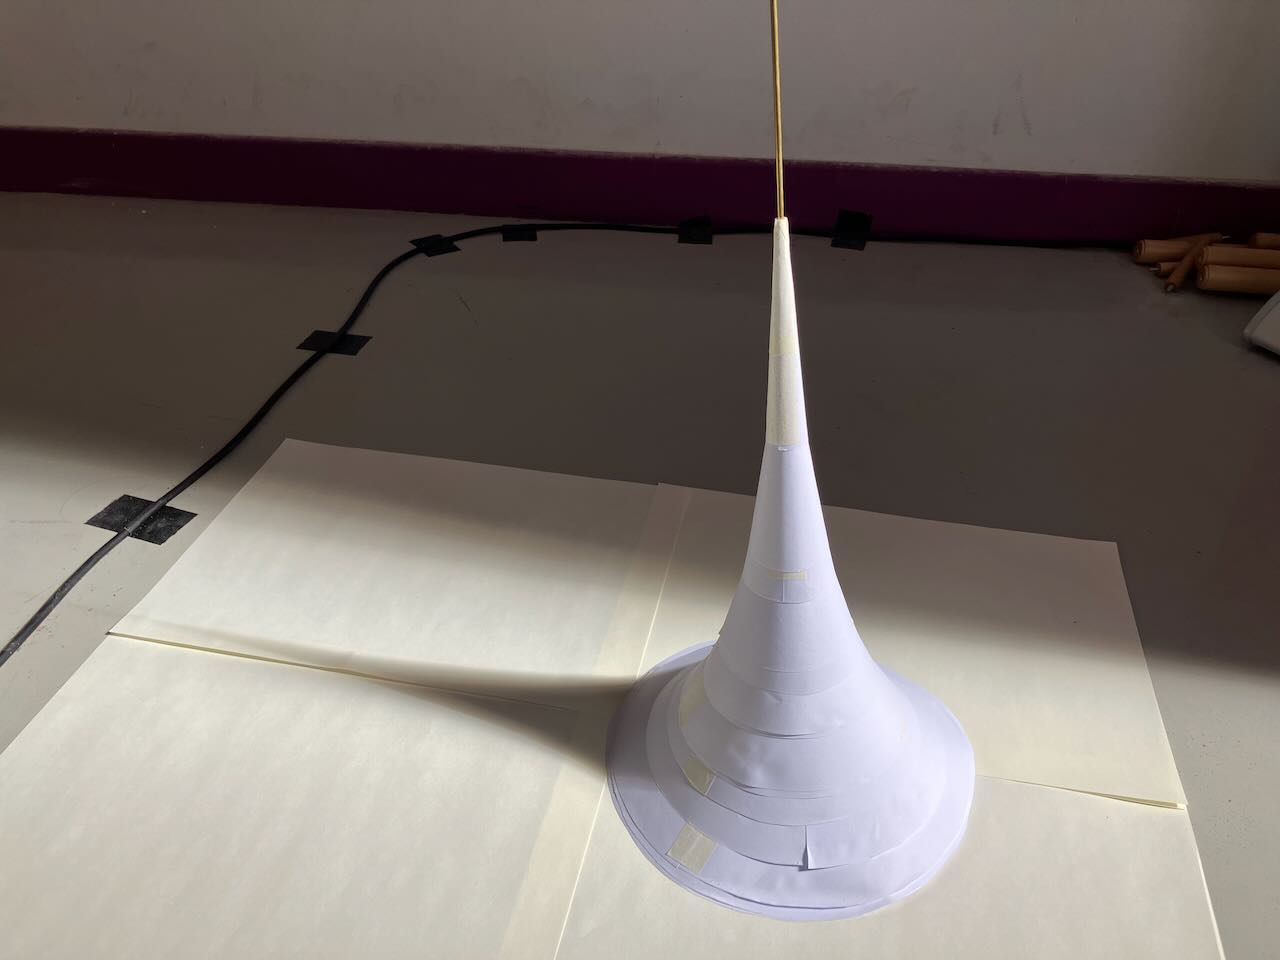
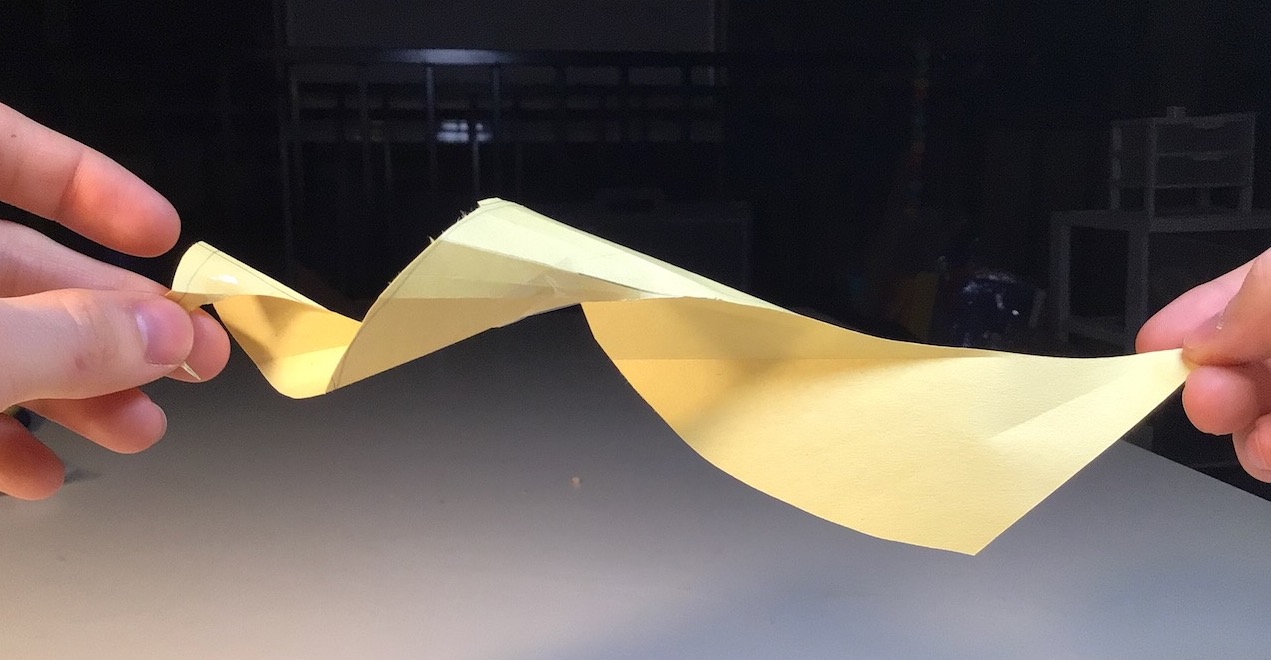
I didn’t want to do math, I just wanted a tangent developable. So I made my own rendition of the tangent developable of the twisted cubic, where I freehanded everything. Here’s a paper test of something which looked… close enough. When i bend the flat, paired paper into 3D, the two sheets pop apart and trace a fun form.
flat template for tangent developable.
For drawing club, I wanted a large mathematical object for people to draw. So I scaled this idea up. I went to the art store, and bought a huge cutting mat out of 3mm thick cardboard. The mat had heft, but could still flex. I folded the mat in half, cut something like the curve above into each half, and taped them together. I bought some brass tube which I could bend into shape, and traced out some roughly helical shape. Finally, I fed the brass rod between the two sheets of my paper. It immediately popped into 3D, forming a reasonably sturdy shape whose central spine conformed to the curve of the brass rod. It’s such a fast way to make a three dimensional sculpture! This one is 3 feet to the side. I sewed the rod in with the paper, which make it sturdier and look cooler, but you don’t have to.
A "tangent developable" (which is not tangent)
The issue is, this isn’t a tangent developable of the spine curve. Check the shadows on some of the other pictures, they don’t meet the spine at tangents. It surely is the tangent developable of something, because its not a cone or a cylinder, but I don’t know the curve it’s tangent to. I guess that’s what I get for guessing. Let me explain the math I skimped out on
A curvature criterion
The thing my model got wrong is the dihedral angle. Look down the spine of the curve, tangent to a point. From this perspective, the spine looks like it stops and turns around, forming a cusp. If my surface was a tangent developable, then the projection of the surface would be the union of tangents of this cusp. In particular, the angle in this projection is zero. This is the dihedreal angle between the sheets of paper meeting at the sheet. In a tangent developable, the cross section of the surface around the spine looks like a cusp.
a helix, looked at from a perspective tangent to the curve, has a cusp in the projection.
Looking at my sculpture down the spine, I can see that the dihedreal angle is not zero. The cross section of my sculpture looks like a wedge, not a cusp. So it’s not a tangent developable of the spine. Where did I go wrong?
The answer is in the paper more on paperfolding by Tabachnikov and Fuchs. Though short, its the most convincing differential geometric analysis of curved crease origami I know of. Let $\Gamma : [0,1] \to \RR^2$ be a plane curve, the crease of the curved crease origami. Suppose that the curve is creased, sending $\Gamma$ to a space curve $\gamma : [0,1] \to \RR^3$, with fold angle along the curve given by $\alpha(t)$. Then, we relate the curvature $k(t)$ of $\gamma(t)$ to the curvature $K(t)$ of $\Gamma(t)$ with the formula:
\[k(t) = K(t) \cos(\alpha(t))\]as you fold a crease (increase $\alpha$) the curvature of the crease through space must decrease. In fact, if $\gamma$ is any space curve with curvature $k(t) \leq K(t)$ less than the plane curve $\Gamma$, then we can solve for a fold angle $\alpha$. There is an incredible amount of flexibility in arranging a curved crease fold in $\RR^3$. Tabachnikov and Fuchs state their results for folding along a crease, but the math is identical as our setup, with two sheets of paper stacked and taped to form a fold. In this setting, the plane curve $\Gamma$ is the outline cut out of the paper, and the space curve $\gamma$ is the metal spine.
Now let’s specialize to tangent developables, which have zero dihedral angle $\alpha(t)=0$. This implies $k(t)=K(t)$ so the space curve $\gamma$ must have the same curvature function as the plane curve $\Gamma$. There is always flexibility in choosing the torsion function of $\gamma$. Any paper model can form many tangent developables, like we saw with the helicoid. If we want the tangent developable of a specific space curve $\gamma$ (Say, the twisted cubic), then $\Gamma$ is determined. First compute the curvature function $k(t)$ for $\gamma$, then integrate this in the plane to find the curve $\Gamma$ with curvature $k(t)$.
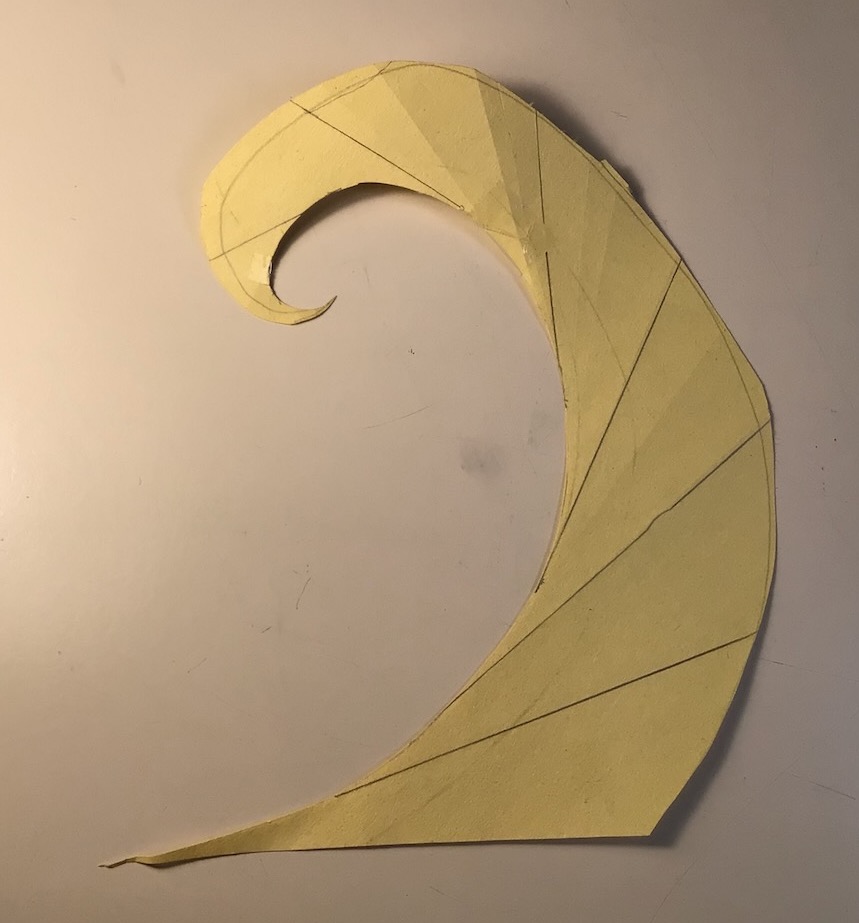
Here’s the plane curve which develops to the twisted cubic, computed by Adrien and Stepan.

By Stepan Paul and Adrien Abgrall. The plane curve with the same curvature function as the twisted cubic. Cut this shape out of paper, and you can form the tangent developable of the twisted cubic.
Thanks to Edmund Harris for lazercutting the coaster.
Notice that the plane curve intersects itself. If you want to make the twisted cubic out of one sheet of paper, you can only make it so large. This picture is a laser etched coaster which I stole (it was too small). They also drew the tangent lines to the plane curve. When unfolded, these will become the lines of ruling of the discriminant locus.
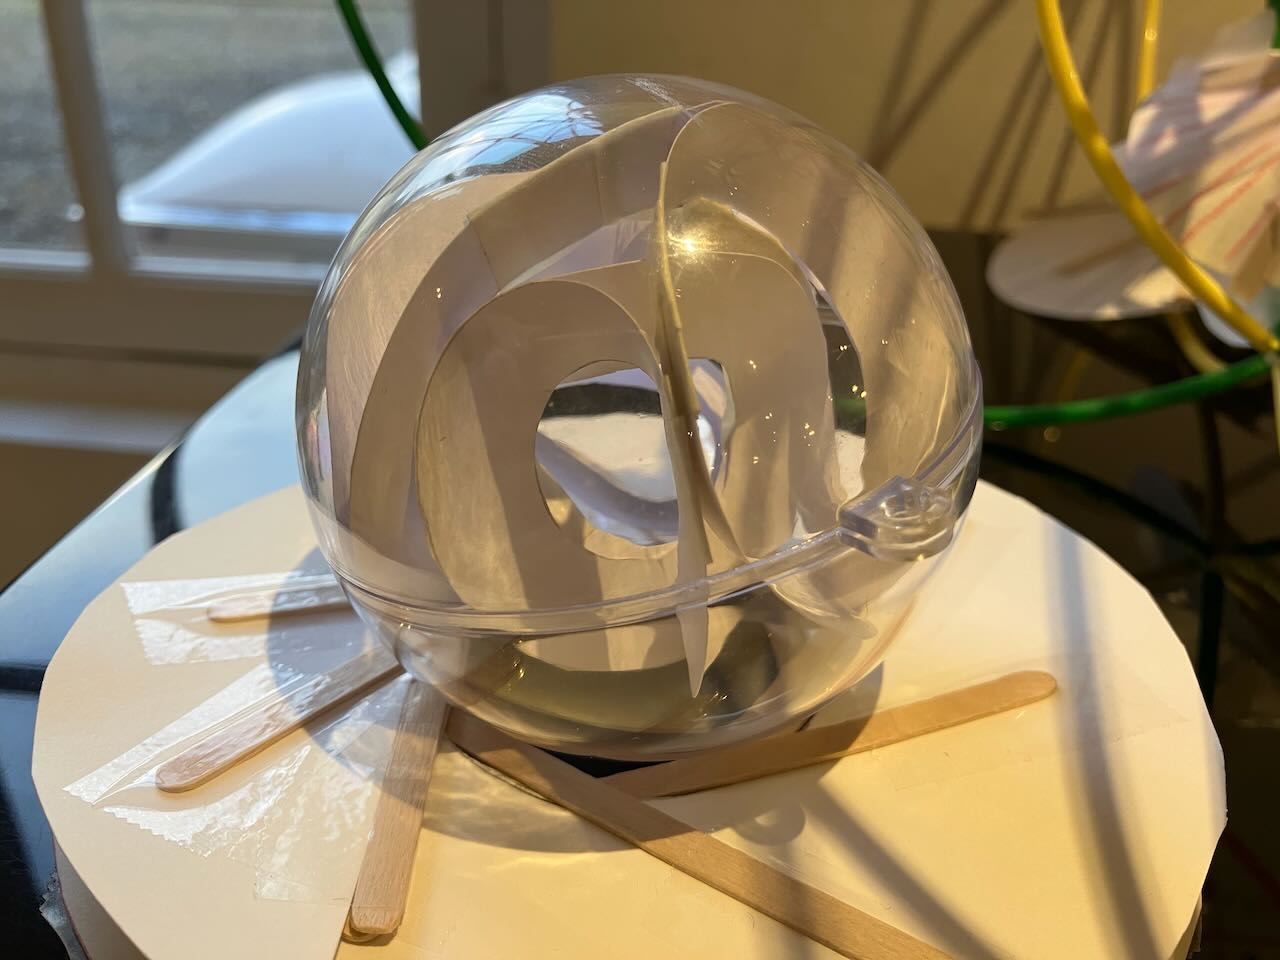
Finally, here’s the discriminant locus, rendered as a paper model inside a Christmas ornament. (Design, once again, by Adrien Abgrall). The twisted cubic is the fold in the surface, and the paper is (supposed to be) the tangent developable.
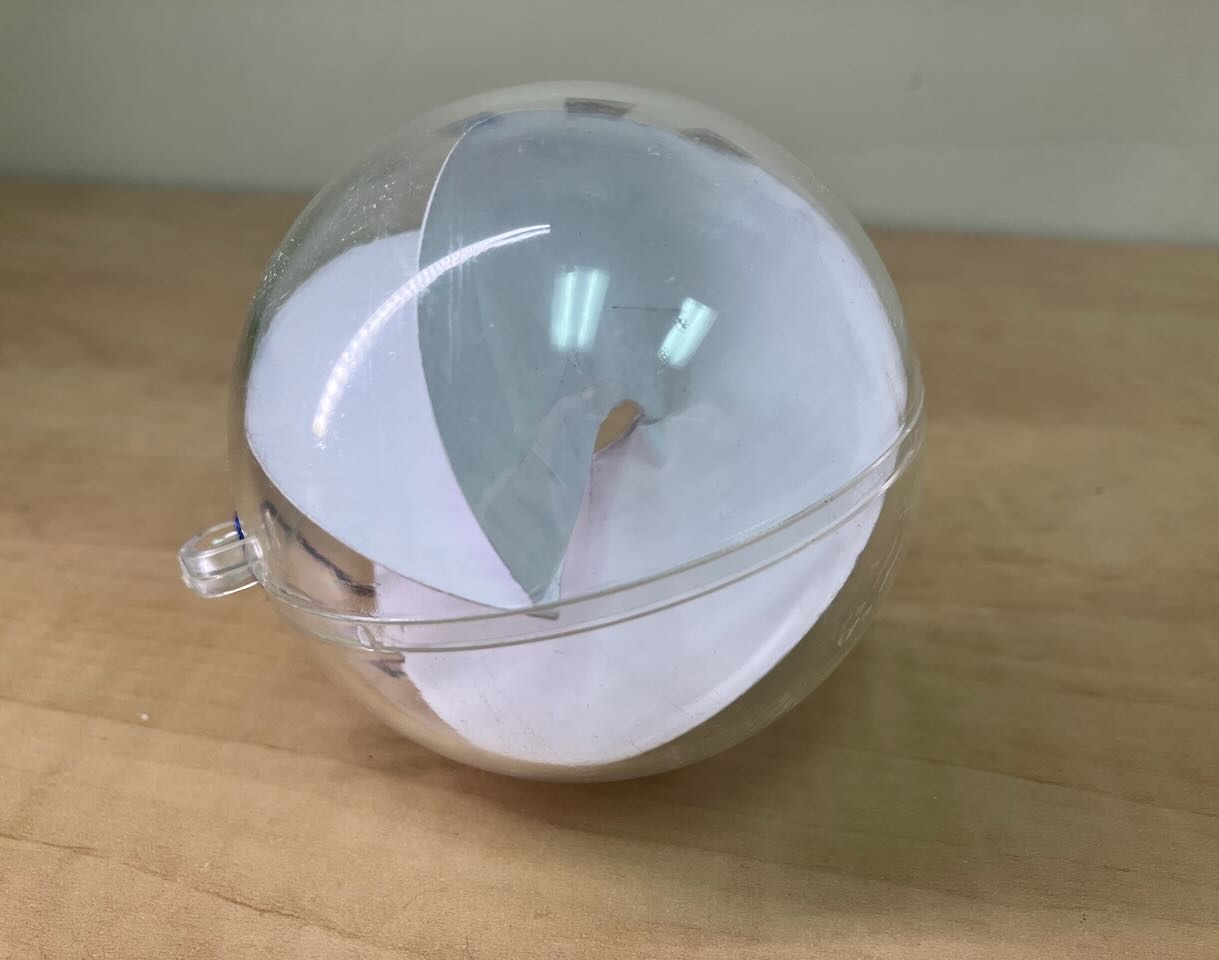
A discriminant marble
by Adrien Abgrall.